|
 |
 |
|
||||||
|
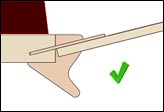
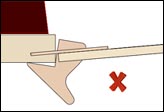
Tips BirdKit.com model kits will fly correctly if they are built correctly. Please make sure all parts are correctly aligned, as shown in the instructions. After you finish building the model, it is very important that you also follow the instructions on how to adjust it for flight. Careful attention to these last instructions will usually solve the problem if your bird isn't flying correctly.
White glue can be softened with a drop of water. Use an eyedropper if available. Let the water sit on the glue joint for several minutes until the glue turns white again. Using this technique and a bit of care, you may be able to realign any glue joints that were not assembled correctly. For example, if the bird is nose-diving, you may not have the tail at the correct angle. It should be angled up slightly and not straight in line with the body. You can also replace the wings on your bird. You might want to do this if the tissue is badly torn, or if you want to change the appearance. Small repairs can be made with cellophane tape or by gluing a piece of scrap tissue over the tear. To remove the old wings completely, follow these steps: First, tear off the old tissue, being careful not to break the wing spars. Some tissue will remain along the spar. Moisten it with water. Allow it to sit for several minutes but not dry out again. Then you can scratch off the old tissue and glue with a fingernail. Then rinse off the remaining glue. Once the wing spars are clean, you can attach the new wing tissue without the heavy and unsightly residue from the previous wings. Lubrication is very important for top performance. The rubber band should always be lubricated. We sell a non-toxic castor bean oil for this purpose. To prevent residue formation, you should wash the oil off with soapy water before storing the rubber band. For an extra performance boost, you can apply castor oil to the crank bearing and all pivot points in the flapping mechanism.
|